Anacortes Gap: a tale of 2 underpaintings.
/>

Underpainting for Anacortes Gap. It was very dark and so I sanded it down aggressively and chunks of paint came off. I decided to start a second to experiment with the same glazing, only with different values in the underpainting. (Values are the relative lights and dark.) This is now the one I call Anacortes Gap 1 and it's 14" x 11" on stretched canvas with 3 coats of acrylic gesso.

Underpainting for Anacortes Gap 2. As you can see, it's much lighter. This one is painted on a lead primed fine linen panel which posed it's own set of challenges as the painting went on.

This is Anacortes Gap 2 after about 3 or 4 layers of glaze. You can see it's darkening quickly despite the light underpainting!
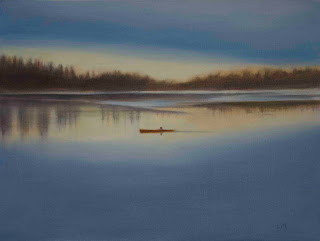
 This is Anacortes Gap 2 today. Dark and mysterious.


Original sketch for Anacortes Gap. I visited the area in December in preparation for the painting. The other sketches looked like they'd work as paintings but didn't.
Underpainting for Anacortes Gap. It was very dark and so I sanded it down aggressively and chunks of paint came off. I decided to start a second to experiment with the same glazing, only with different values in the underpainting. (Values are the relative lights and dark.) This is now the one I call Anacortes Gap 1 and it's 14" x 11" on stretched canvas with 3 coats of acrylic gesso.
Underpainting for Anacortes Gap 2. As you can see, it's much lighter. This one is painted on a lead primed fine linen panel which posed it's own set of challenges as the painting went on.
This is Anacortes Gap 2 after about 3 or 4 layers of glaze. You can see it's darkening quickly despite the light underpainting!
 This is Anacortes Gap 2 today. Dark and mysterious.
Anacortes Gap 1, after several initial glaze layers. Right away the areas of no paint disappeared and the surface became uniformly dark.
Anacortes Gap 1, nearly finished, very dark but with good lights in the trees on the right. Since this photo I've softened the tree line on the left. You can see the majority of work from the early glazes to the end is in feathering the trees on the right. Since these are thin glazes, that took several weeks, one glaze per day.
At this point, I'm not sure whether I prefer Anacortes Gap 1 or 2. Both successfully captured the sense of mystery in a road through an old cedar forest.


Comments